Please pray for my dear friend, Grace!!


Blogroll

Splitcoast Dirty Dozen

Splitcoast stampers Alumni

Design Teams
ODBD Bread Basket

ODBD Design Team


My past dt sisters at ODBD
-
-
Coloring fun1 year ago
-
Wonderful Christmas Ornaments2 years ago
-
-
Natural Beauties ~ Power Poppy7 years ago
-
Feel Better Soon9 years ago
-
ODBDSLC268 Anything Goes10 years ago
Tuesday, July 26, 2011
Hi all!! I hope you are all doing well!! Life has been busy and very HOT here. Blogger has been giving me a very hard time. It takes forever to leave a comment since when I go to publish it, it keeps coming up as SERVICE UNAVAILABLE. GRRR!!
Anywho...on to my post...which took me forever to get to post....
I so love to make homemade gifts for friends and family. There is no better way of showing someone you care than to take to make something from the heart.
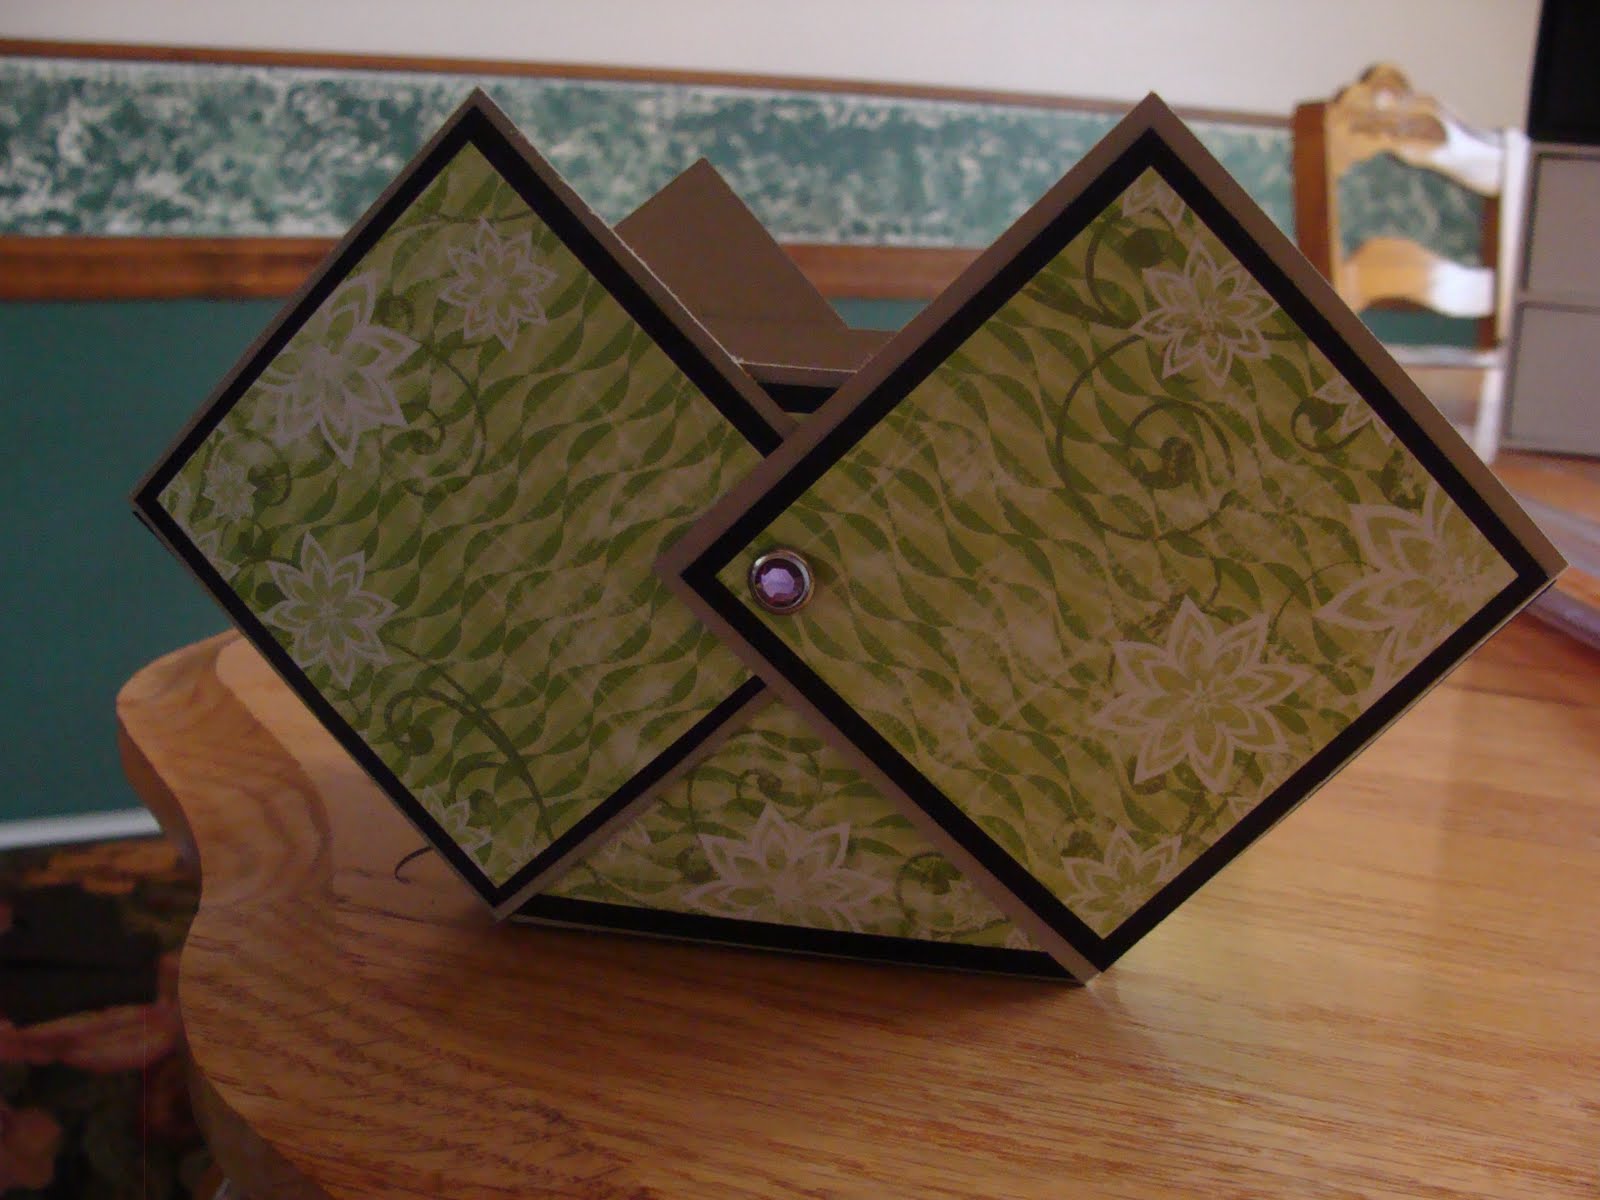
Today I would like to share a tutorial on how to make a “diaper fold gift basket”. The base of my basket is 3 by 3 inches.

You will need:
- a cutter
- a scoring tool
- a 12 by 12 inch piece of heavy cardstock
- designer paper
- 2 brads
- An edger punch
- adhesive
- embellishments and stamps of choice
- stamps I used: Our Daily Bread Designs: Hydrangea (Garden Collection), Serve the Lord and Crocheted Circle die.
Step 1:
Cut a 9 by 9 inch square out of the card stock. Save the remaining scrap for the handle.
Step 2: Score the card stock at 3 inches 6 and inches all the way down both horizontally and vertically.
Step 3: Cut the line at the 3 inch and 6 inch score line to the perpendicular score line on each side.
Your card stock should look like this:

Step 4: Cut and paste 8 – 2 ¾ inch square pieces of designer paper to adhere to all the outside squares. The middle square is the bottom and does not need a piece of designer paper.

Step 5: Bring up two of the cut squares crossing the middle square making it look like a diaper. Pierce a hole in the middle and insert brad but do not bend brad yet. Do the same for the opposite side.

Step 6: Put the basket aside and begin handle. Cut a 3 by 12 inch strip of cardstock (from remaining scrap.

Step 7: Punch both edges lengthwise to make a decorative edge. Embellish as desired. Pierce a hole 1/2 inch from each end of the handle.

Step 8: Remove brad on one side of the basket and slip completed handle between 2 folded in squares and the center square (like a sandwich). Line up pierced holes.

You should not see the handle on the inside of the basket.
Insert brad and bend back ends to secure in place.

Step 9: Repeat for the other side.
Decorate as desired. Here is my finished basket.
Thanks for stopping by! I hope you enjoyed my tutorial!!
blessings,
Chris
Subscribe to:
Post Comments (Atom)
Popular Posts
-
 This Blog Candy is now Closed. The winner will be announced sometime on Monday, November 2. Thanks for all who left comments!!! Woo hoo! ...
 -
 Hello Friends!! I hope you all had a great weekend!! Here it is November already! Time is flying and the holidays are upon us. It is ti...
 -
 Candy is now closed....Edited to include: Anywho...today is the day I said I would announce the birthday blog candy winner!! Thanks to...
 -
 Hello friends!! Welcome to the Our Daily Bread Designs October Release Blog Hop!! If you got here from Sandee 's Blog , you are in...
 -
 Hello my friends! Welcome to the Our Daily Bread designs April Release Blog Hop! If you got here from Grace's incredible blog , yo...
 -
 Happy Tuesday Friends!! I hope you are having a great beginning to your day!! Today I am popping in to share a card using a sketch for ...
 -
 Hello Friends!! I hope this post finds you all well!! Today Our Daily Bread Designs has a fun Christmas release!! The best part is that t...
 -
 Happy Monday Everyone!! I hope everyone had a great weekend!! It was so nice to see some sun after having a few weekends of major rain. T...
My dt alumni friends
-
-
Long Stem Florals...1 day ago
-
Summer Layers with Ageless Style1 day ago
-
Elizabeth Craft Design-Lacy2 days ago
-
-
-
Bee-lieve6 years ago
-
Natural Beauties ~ Power Poppy7 years ago
-
-
-
-
Attention Hoarders. . .10 years ago
-
ODBD For the Love of Winged Things14 years ago


19 comments:
Chris you make this look so easy I may just try it lol, yours is absolutely stunning, love the colours the black against that green paper is beautiful. Joey x
Thank you sooo much for this awesome tutorial Chris! It´s a lovely giftbasket, going to have to try this for sure :)
Lovely colours too :)
Hugs!
This is great tutorial its a lovely basket well done:) Sandra H
It's a great tutorial Chris and one I'm going to use today. Have a baby shower on Saturday and this will be a perfect extra. Thanks so much for sharing. "Hugs" Carol
Hi Chris,
What a fantastic basket. I love this and the tutorial is a fabulous bonus. Will definitely have a go at this one.
Hugs,
Fiona x
Fabulous little basket, I used to make heaps of these filled with fudge to take to the market and sold them all, very popular with children....but mine never looked as pretty as this.Great tutorial..now I know how to secure the handle better..
Luv CHRISSYxx
Wow this is gorgeous - Thanks for the tutorial.
Hugs
Penni
X
That looks so easy! Thank you for the great tutorial! I always wondered how you made your beautiful baskets:) I hear you on the Blogger comments~it's been very annoying...
This is gorgeous, Chris! I'm not big on crazy folding projects but I might just try this for a co-worker's birthday, it would be perfect!! Thanks for the tutorial!
Your basket is gorgeous, Chris! Thanks for the tutorial, too!
Your artwork is so beautifully executed! Every detail perfect!
Thank you for taking a moment to say such kind things on my blog. Glad you did so I could "discover" yours.
Kindest regards,
Jennifer Ferrell
Wow Chris you rock for sharing this great tutorial of such an awesome basket!!!
Wowww Chris,So gorgeous.
Hugs Riet.xx
This is gorgeous Chris!! I love the colors...the black & green are gorgeous together! Fantastic tutorial!
Hugs, Tammy
I saw your comment, and I realized that I have not visited in a long long time. I love this. The black and green are just beautiful together. I see you are still very talented and full of inspiration.
Hugs
Tanya
What a fabulous design Chris. I love the shape of the basket. Beautiful!
What a darling basket, Chris...the colors are sooo pretty and what a great shape!!!!
SOOOOO beautiful Chris, and such a fab design!!! Awesome tutorial sweetie!
Your gift basket is so cute! It's a great idea and a well-done tutorial. Thanks so much!