Please pray for my dear friend, Grace!!


About Me

- Chris Olsen, Glowbug
- Hi! I am Chris, also known as Glowbug on Splitcoaststampers. I live in Appomattox, VA. I so much enjoy blogging and the so many good friendships that have formed as a result. During my free time, I am creating cards or projects and I so enjoy Challenges. I have a very supportive husband, Scott, who understands my addiction and two young daughters,Meghan, 9 and Nicki, 12 years of age, who can't wait to get their hands on my stamps and embellishments. I was an elementary school teacher until my youngest was born. I have now been blessed with the opportunity to teach my two girls at home. I use stamping as a hobby or way to escape.
Blogroll

Splitcoast Dirty Dozen

Splitcoast stampers Alumni

Design Teams
ODBD Bread Basket
ODBD Design Team


My past dt sisters at ODBD
-
-
Coloring fun2 years ago
-
Wonderful Christmas Ornaments3 years ago
-
-
Natural Beauties ~ Power Poppy7 years ago
-
Feel Better Soon9 years ago
-
ODBDSLC268 Anything Goes10 years ago


Showing posts with label tutorials. Show all posts
Showing posts with label tutorials. Show all posts
Wednesday, January 30, 2013
Before moving into our new home, I had made a few heart gift boxes and shared them on my personal blog. I had several requests from my blog viewers asking for a tutorial on how to make them. So today.....several months later....is a tutorial.


Materials:
-1 piece of 12x12 solid cardstock (mine is black)
- 2 different pieces of 6x6 designer paper (1 piece for layering on each side and 1 for the lining on the inside of the heart box)
-Spellbinders Classic and Scalloped Hearts (you will need the largest classic and scalloped dies for the actual box...I used several for decorating as well)
-12x12 cutter and scorer
- 1/4" scoretape
-scissor
optional:
Bo Bunny - Home and SEI dp.
Our Daily Bread Designs- Be Joyful stamp set
copics (Booo, Boo, Bo1, Bo2, Bo4, YG91, YG93, G94)
Gold Flowersoft and Flowersoft glue

Steps:
1. For the purpose of this tutorial, I already precut 2 of the largest scalloped hearts and a 2"x9 1/2" out of the solid card stock and 4 hearts using the largest classic heart (2 from each piece of the 6x6" sheets of designer papers).

2. Score the 2 x 9 1/2" piece of cardstock and 1/4 inch from each long side.


3. Apply Scor-tape to each of the 1/4" scored edges.

4.Cut slits on the scor-tape approximately 1/4 inch apart all the way across on each side.

Since a heart can't sit on it's point, I make the box sit on it's side.
5. Peel off the scoretape and adhere one side of the scored strip to the wrong side of the "Lining".

6. Do the same thing with the other side of the scored rectangular strip. The wrong side should be pointing out.
hint: This side is more tricky to line up so I begin adhering at the point of the heart starting with the middle of my strip. You may want to peel off half of the tape at a time and adhere to the heart.


7. Adhere the decorative layer of dp to each of the scalloped card stock hearts.

8. Adhere each of the card stock scalloped hearts to the heart "frame" you have created to complete the heart box "shell".


9. Decorate as desired.


I used Bo Bunny - Home and SEI dp. The sentiment and image is from Our Daily Bread Designs- Be Joyful stamp set. The image was colored with copics (Booo, Boo, Bo1, Bo2, Bo4, YG91, YG93, G94). Gold flowersoft was added to the centers.
I hope you enjoyed my tutorial and are in some way inspired by my project. God bless you!!


Materials:
-1 piece of 12x12 solid cardstock (mine is black)
- 2 different pieces of 6x6 designer paper (1 piece for layering on each side and 1 for the lining on the inside of the heart box)
-Spellbinders Classic and Scalloped Hearts (you will need the largest classic and scalloped dies for the actual box...I used several for decorating as well)
-12x12 cutter and scorer
- 1/4" scoretape
-scissor
optional:
Bo Bunny - Home and SEI dp.
Our Daily Bread Designs- Be Joyful stamp set
copics (Booo, Boo, Bo1, Bo2, Bo4, YG91, YG93, G94)
Gold Flowersoft and Flowersoft glue

Steps:
1. For the purpose of this tutorial, I already precut 2 of the largest scalloped hearts and a 2"x9 1/2" out of the solid card stock and 4 hearts using the largest classic heart (2 from each piece of the 6x6" sheets of designer papers).

2. Score the 2 x 9 1/2" piece of cardstock and 1/4 inch from each long side.


3. Apply Scor-tape to each of the 1/4" scored edges.

4.Cut slits on the scor-tape approximately 1/4 inch apart all the way across on each side.

Since a heart can't sit on it's point, I make the box sit on it's side.
5. Peel off the scoretape and adhere one side of the scored strip to the wrong side of the "Lining".

6. Do the same thing with the other side of the scored rectangular strip. The wrong side should be pointing out.
hint: This side is more tricky to line up so I begin adhering at the point of the heart starting with the middle of my strip. You may want to peel off half of the tape at a time and adhere to the heart.


7. Adhere the decorative layer of dp to each of the scalloped card stock hearts.

8. Adhere each of the card stock scalloped hearts to the heart "frame" you have created to complete the heart box "shell".


9. Decorate as desired.


I used Bo Bunny - Home and SEI dp. The sentiment and image is from Our Daily Bread Designs- Be Joyful stamp set. The image was colored with copics (Booo, Boo, Bo1, Bo2, Bo4, YG91, YG93, G94). Gold flowersoft was added to the centers.
I hope you enjoyed my tutorial and are in some way inspired by my project. God bless you!!
~Chris

Monday, December 3, 2012
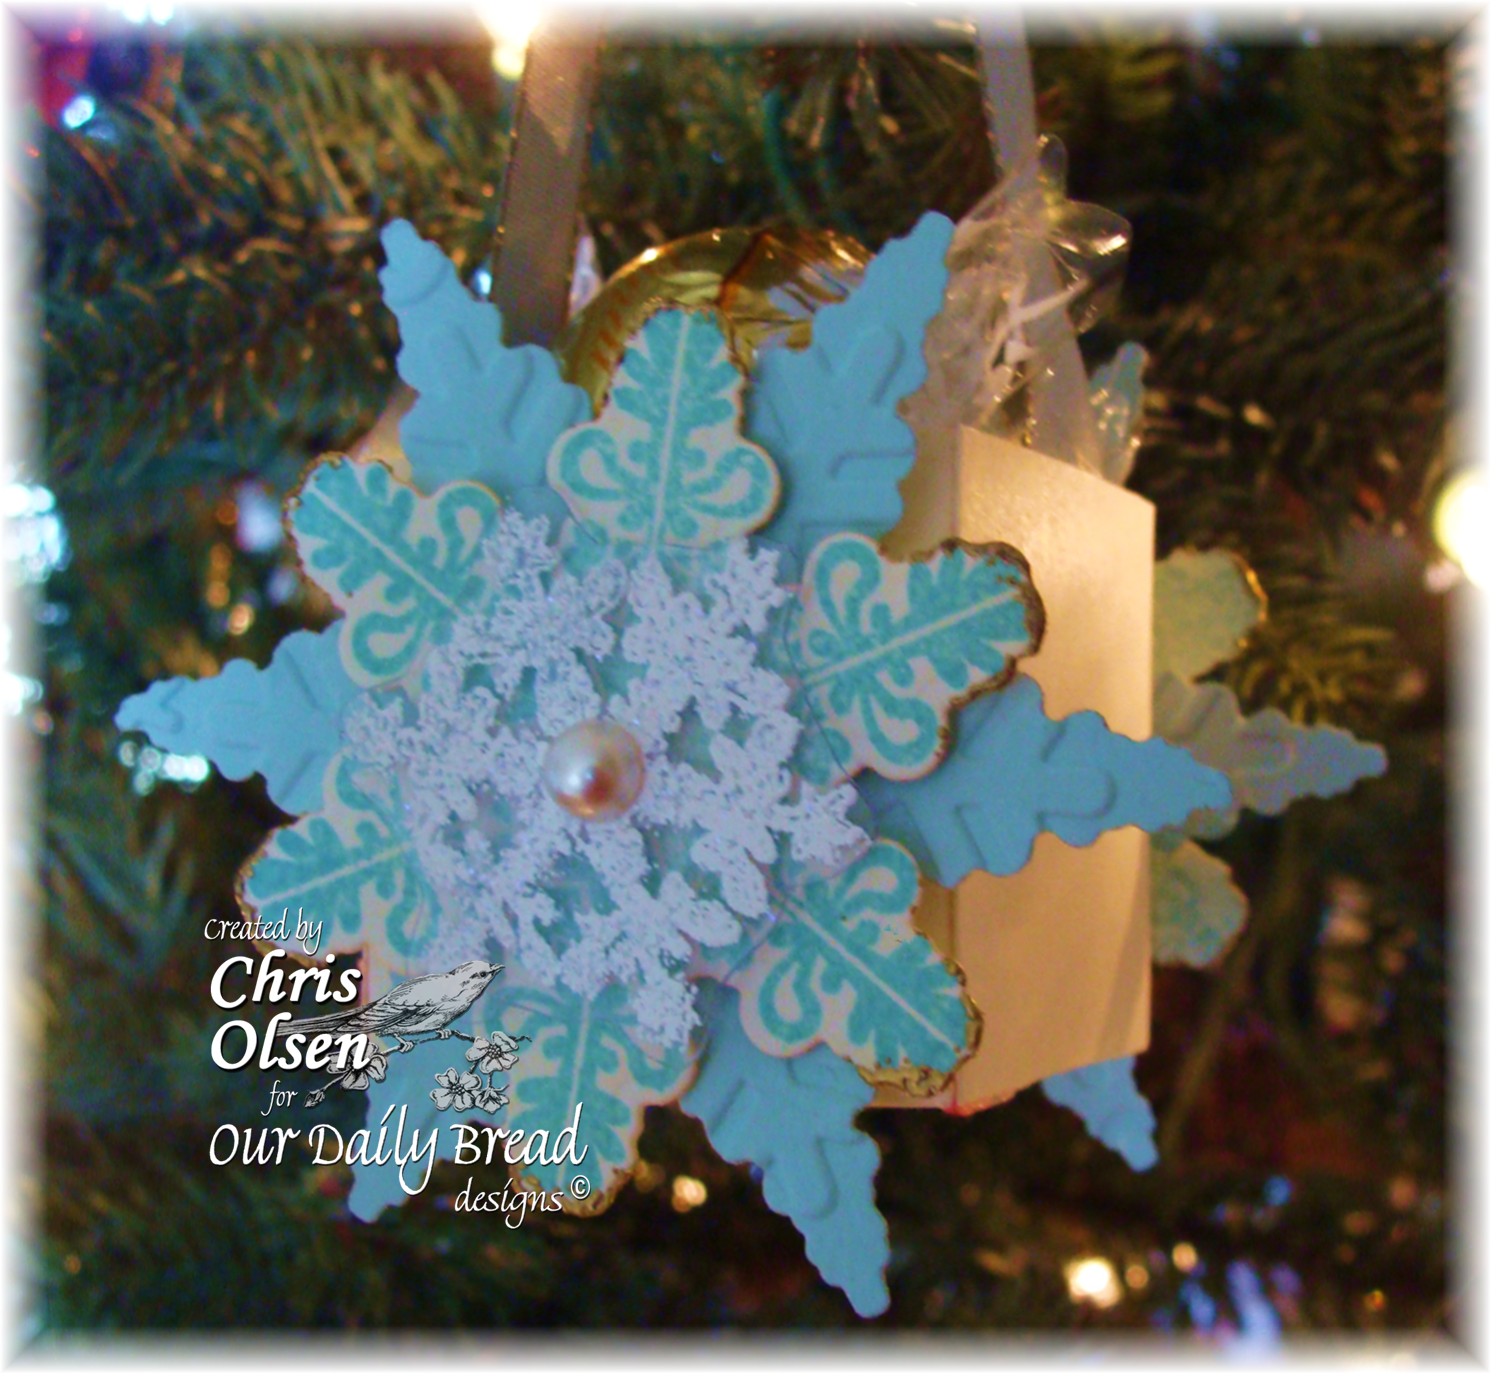
Hello Friends!! I hope you all have had a great weekend!! Sorry that I am posting so late today but I ran out of time writing a tutorial for my viewers. I had several requests for a tutorial on how to make the Ornament treat box I posted last week.

So today I wanted to share how I made it but instead of using the ODBD ornament, I used the new release Sparkling Snowflake and ODBD Snowflake Custom die. At each step, I have also left the dimension for the box I created for the ornament I already posted in italics and parenthesis). I hope you enjoy it.
For this ornament I used:
Fiskars cutter and scoring blade
1/4 inch scoretape
Vanilla Cardstock
Sky Blue cardstock (optional)
thick plastic recycled from Cuttlebug folder packaging
Cuttlebug Snowflake embossing folder from Winter Wonderland- pictured below (optional)
Baja Breeze, Sky Blue, and Versa Mark ink
Sparkling Snowflake stamp set from Our Daily Bread Designs
Our Daily Bread Designs Custom Snowflake die manufactured by Spellbinders

Step 1: Design your snowflake or ornament the way you would like. Make 2 since there is two right sides on your Snowflake Ornament treat box. (Same for the ornament treat box)
If you are using the ODBD Snowflake dies, I noticed the Cuttlebug embossing folder almost has an exact fit for the largest within the folder.


Step 2: Cut a 2 inch by 6 inch strip of vanilla paper and 2 squares that are a 1 1/2 by 1 1/2 inch (cut a 2 1/4 by 5 1/4 piece of card stock and 2 squares that are 1 3/4 by 1 3/4 for the Ornament box)


Step 3: Score a 1/4 inch line going lengthwise one each side. (same for the Ornament box)


Step 5: Cut slits from the edge on the scored lines like pictured below (same for the Ornaments treat box)

Step 6: Put 1/4 inch pieces of score tape on each corner of the box as pictured below. Repeat on both sides. Fold up sides and adhere. (same for the Ornaments treat box)


Step 8: Adhere the pre-cut Squares to the box. (same for the Ornaments treat box)
This is what it looks like when it is adhered.


Step 10: Adhere ribbon in the middle of the box starting on the bottom inside (same for the Ornaments treat box)


Here is my completed ornament:

Thanks for stopping by! I hope you are somehow inspired by my creation. .....and maybe even decide you would like to try my tutorial. It is very fun and easy to create and it is a great little something with a wow factor. Tomorrow I will share a matching card.
Have a blessed day!!
blessings,

challenges I entering my creation in:
Addicted to Stamps Challenge - Christmas TimeEclectic Ellapu - Santa Paws and/or Snow Flakes Sunny Challenges Snowflakes The Cupboard Trilogy - Frosty WinterUnique Crafters Challenge - Christmas Visible Image Monthly Challenge ChristmasMake it Monday- Anything Goes Creatalicious Challenges Winter Cupcake Craftroom Anything for ChristmasLadybug Crafts Christmas Natalie and Amy's Challenge Christmas or winter Sparkles Forum Challenges Christmas is coming Dream Valley Challenges Non-Traditional Christmas Scrapper`s Delights Paper Crafts - Non-Traditional Christmas The Ribbon Girls Christmas Projects The Squirrel & the Fox Summer or Winter 2 Sisters - #120 Christmas Sparkle (the snowflake on the front is embossed with sparkly holographic glitter) Challenge Up Your Life - 1st Snow Hiding in my Craft Room Blue & White Little Claire's Christmas Sweet Stampin Snowflakes and Ribbons
Wednesday, November 9, 2011
Happy Hump Day!! I hope you are all doing well!! It is hard to believe it already the middle of the week. Where does the time go. This week I have been busy doing yard work with all the falling leaves! It has been a blessing to have such nice weather to work in thus far.
Anywho, today I am popping in to share a side step card using the Sweet Christmas Wishes from Our Daily Bread Designs and the ODBD Window Die

Card Recipe:
Stamps Used: ODBD Sweet Christmas Wishes
Dies: ODBD Window Die custom made by Spellbinders, Spellbinders Scalloped and classic circles
Paper: Die Cuts with a View Holiday, Scraps from Stampin up in So Saffron, Bitter Chocolate, Neenah White, forest green CS
Punches: Martha Stewart Daisy Edge Punch,, twig punch
Embossing folders: Soft Swirls
Ribbon: Stampin Up Re Striped Grosgrain ribbon, Bow Easy
Accessories: Polar white flower soft, gold baubles
I made this side step design when playing with my sisters Stampin Up sets in Boston. Jeanne showed Grace and I step by step. Since many of you did not have the opportunity to be there, I thought it would be fun for me to include a template. Please excuse my extremely novice attempts to draw it digitally for you. I simply do not have the right programs. LOL! The template needs to be rotated.
Since the text is somewhat hard to read, here are the measurements for the score/cutting marks going across: 1 inch, 1inch, 3 1/2 inches, 3 1/2 inches, 1 inch, and 1 inch. The card stock is cut 4 1/2 by 11 inches. The dotted lines are score marks and the solid lines are cutting marks.

Challenges I am entering this creation in:
Crafting for all Seasons - #13 textureFreshly Brewed - #71 foodStampavie and More - #155 Anything Goes Crazy Amigo Challenge - Swirls (my embossed background)Partytime Tuesdays - PTT #41 Bling It OnSweet Stamps - #40 Red Green & GoldTCP Tuesday - #183 Holiday Colours*Top Tip Tuesday - #59 Anything Christmas GoesUse It Tuesdays - must use hoarded supplys & say what you used - #19 Cooking (striped grosgrain and Christmas paper are my hoarded supplies)Craft Your Passion - Anything Goes PLUS Brown (framed in brown as well as the table is brown)Heart Song Inspirations - Anything GoesMake it Monday - always Anything GoesThere She Goes - Holiday ProjectsCard Cupids - BlingChristmas Inspirations - must be Christmas - Bows Creative Inspirations Paint - Anything GoesDream Valley Challenges - Anything Goes Whoopsi Daisy Tag It (tag on my card)2 Sisters - #64 RibbonCrafty Hazelnut's Christmas - must be Christmas - #45 Bright Colours and/or SparkleDi's Digis Designs Ribbons and BowsLittle Claire's - #14 ChristmasFloweret ChristmasInspire Me Fridays - always anything goesMami Doodles - Christmas Samuel Taylor's Challenge - Christmas Cards I Did It Creations - Christmas/WinterPaper Take Weekly - Christmas
Anywho, today I am popping in to share a side step card using the Sweet Christmas Wishes from Our Daily Bread Designs and the ODBD Window Die

Card Recipe:
Stamps Used: ODBD Sweet Christmas Wishes
Dies: ODBD Window Die custom made by Spellbinders, Spellbinders Scalloped and classic circles
Paper: Die Cuts with a View Holiday, Scraps from Stampin up in So Saffron, Bitter Chocolate, Neenah White, forest green CS
Punches: Martha Stewart Daisy Edge Punch,, twig punch
Embossing folders: Soft Swirls
Ribbon: Stampin Up Re Striped Grosgrain ribbon, Bow Easy
Accessories: Polar white flower soft, gold baubles
I made this side step design when playing with my sisters Stampin Up sets in Boston. Jeanne showed Grace and I step by step. Since many of you did not have the opportunity to be there, I thought it would be fun for me to include a template. Please excuse my extremely novice attempts to draw it digitally for you. I simply do not have the right programs. LOL! The template needs to be rotated.
Since the text is somewhat hard to read, here are the measurements for the score/cutting marks going across: 1 inch, 1inch, 3 1/2 inches, 3 1/2 inches, 1 inch, and 1 inch. The card stock is cut 4 1/2 by 11 inches. The dotted lines are score marks and the solid lines are cutting marks.

Challenges I am entering this creation in:
Crafting for all Seasons - #13 textureFreshly Brewed - #71 foodStampavie and More - #155 Anything Goes Crazy Amigo Challenge - Swirls (my embossed background)Partytime Tuesdays - PTT #41 Bling It OnSweet Stamps - #40 Red Green & GoldTCP Tuesday - #183 Holiday Colours*Top Tip Tuesday - #59 Anything Christmas GoesUse It Tuesdays - must use hoarded supplys & say what you used - #19 Cooking (striped grosgrain and Christmas paper are my hoarded supplies)Craft Your Passion - Anything Goes PLUS Brown (framed in brown as well as the table is brown)Heart Song Inspirations - Anything GoesMake it Monday - always Anything GoesThere She Goes - Holiday ProjectsCard Cupids - BlingChristmas Inspirations - must be Christmas - Bows Creative Inspirations Paint - Anything GoesDream Valley Challenges - Anything Goes Whoopsi Daisy Tag It (tag on my card)2 Sisters - #64 RibbonCrafty Hazelnut's Christmas - must be Christmas - #45 Bright Colours and/or SparkleDi's Digis Designs Ribbons and BowsLittle Claire's - #14 ChristmasFloweret ChristmasInspire Me Fridays - always anything goesMami Doodles - Christmas Samuel Taylor's Challenge - Christmas Cards I Did It Creations - Christmas/WinterPaper Take Weekly - Christmas
Thanks for stopping by and for all your comments!! They are greatly appreciated!!
Have a great day!
hugs,

hugs,

Tuesday, July 26, 2011
Hi all!! I hope you are all doing well!! Life has been busy and very HOT here. Blogger has been giving me a very hard time. It takes forever to leave a comment since when I go to publish it, it keeps coming up as SERVICE UNAVAILABLE. GRRR!!
Anywho...on to my post...which took me forever to get to post....
I so love to make homemade gifts for friends and family. There is no better way of showing someone you care than to take to make something from the heart.
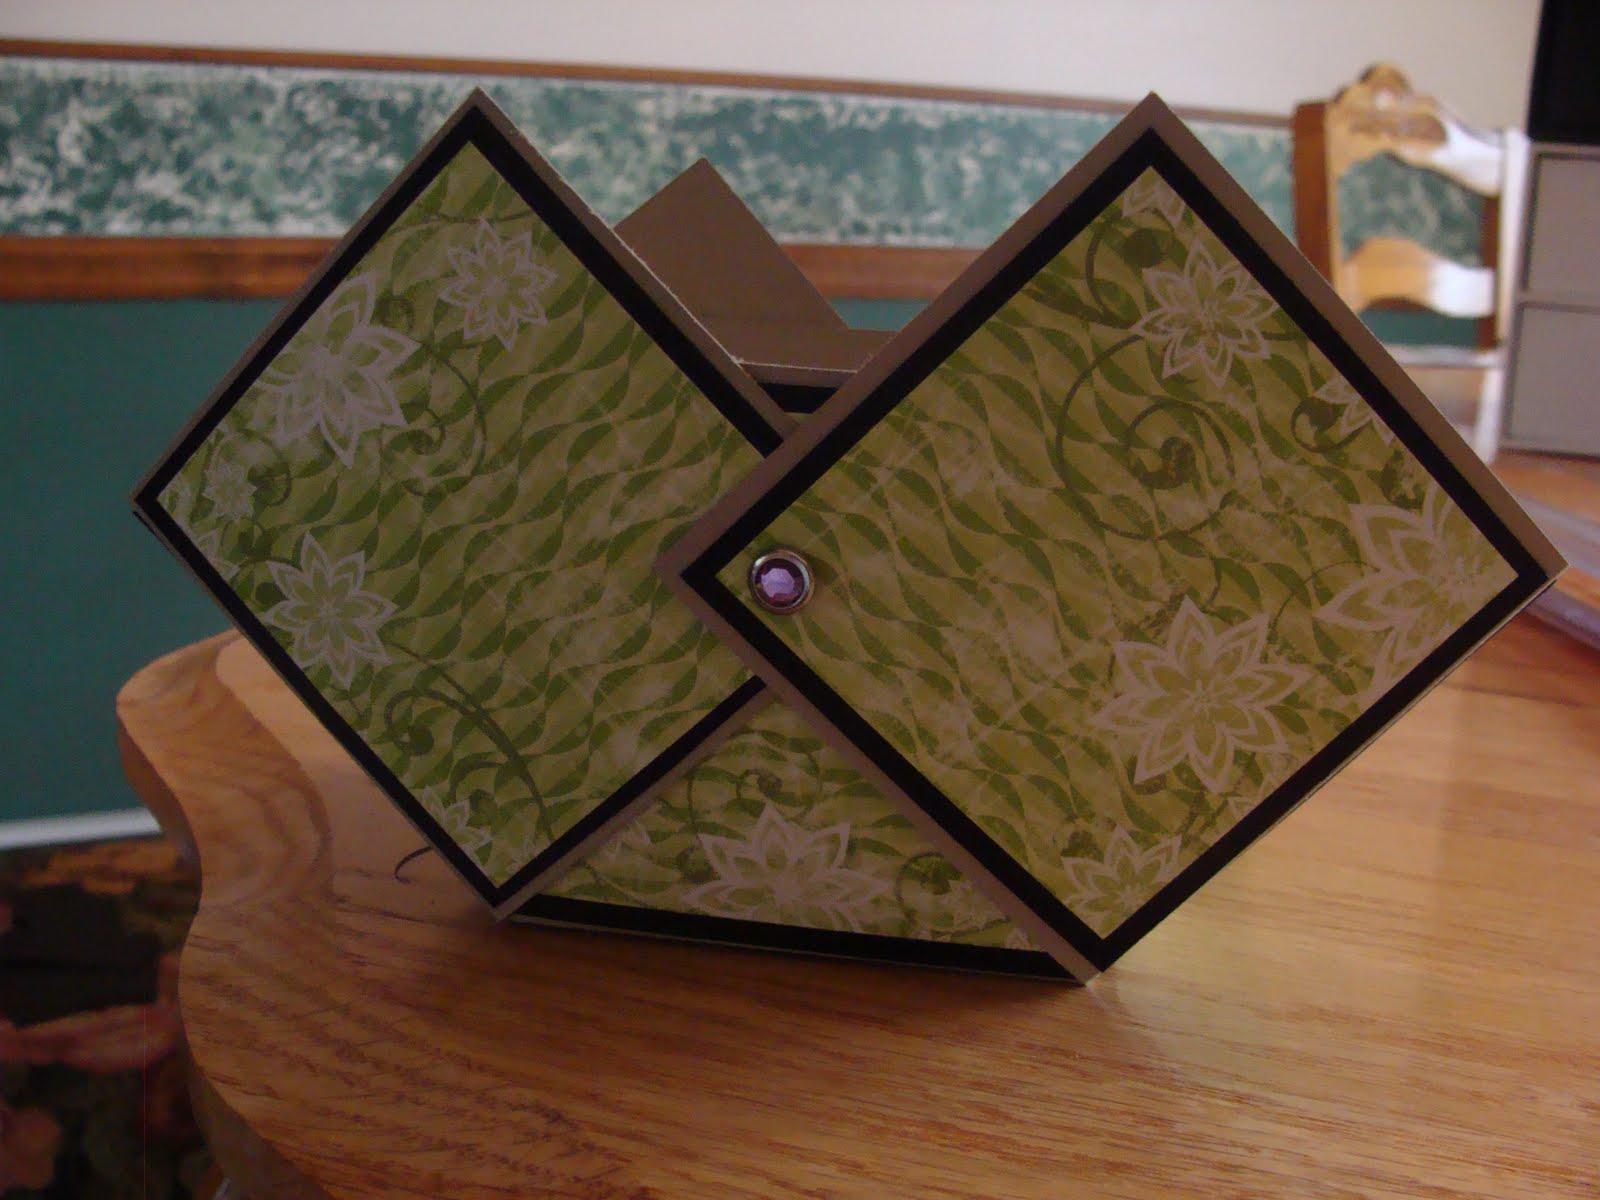
Today I would like to share a tutorial on how to make a “diaper fold gift basket”. The base of my basket is 3 by 3 inches.

You will need:
- a cutter
- a scoring tool
- a 12 by 12 inch piece of heavy cardstock
- designer paper
- 2 brads
- An edger punch
- adhesive
- embellishments and stamps of choice
- stamps I used: Our Daily Bread Designs: Hydrangea (Garden Collection), Serve the Lord and Crocheted Circle die.
Step 1:
Cut a 9 by 9 inch square out of the card stock. Save the remaining scrap for the handle.
Step 2: Score the card stock at 3 inches 6 and inches all the way down both horizontally and vertically.
Step 3: Cut the line at the 3 inch and 6 inch score line to the perpendicular score line on each side.
Your card stock should look like this:

Step 4: Cut and paste 8 – 2 ¾ inch square pieces of designer paper to adhere to all the outside squares. The middle square is the bottom and does not need a piece of designer paper.

Step 5: Bring up two of the cut squares crossing the middle square making it look like a diaper. Pierce a hole in the middle and insert brad but do not bend brad yet. Do the same for the opposite side.

Step 6: Put the basket aside and begin handle. Cut a 3 by 12 inch strip of cardstock (from remaining scrap.

Step 7: Punch both edges lengthwise to make a decorative edge. Embellish as desired. Pierce a hole 1/2 inch from each end of the handle.

Step 8: Remove brad on one side of the basket and slip completed handle between 2 folded in squares and the center square (like a sandwich). Line up pierced holes.

You should not see the handle on the inside of the basket.
Insert brad and bend back ends to secure in place.

Step 9: Repeat for the other side.
Decorate as desired. Here is my finished basket.
Thanks for stopping by! I hope you enjoyed my tutorial!!
blessings,
Chris
Subscribe to:
Posts (Atom)
Popular Posts
-
 This Blog Candy is now Closed. The winner will be announced sometime on Monday, November 2. Thanks for all who left comments!!! Woo hoo! ...
-
 Hello Friends!! I hope you all had a great weekend!! Here it is November already! Time is flying and the holidays are upon us. It is ti...
-
 Candy is now closed....Edited to include: Anywho...today is the day I said I would announce the birthday blog candy winner!! Thanks to...
-
 Hello friends!! Welcome to the Our Daily Bread Designs October Release Blog Hop!! If you got here from Sandee 's Blog , you are in...
-
 Hello my friends! Welcome to the Our Daily Bread designs April Release Blog Hop! If you got here from Grace's incredible blog , yo...
-
 Happy Tuesday Friends!! I hope you are having a great beginning to your day!! Today I am popping in to share a card using a sketch for ...
-
 Hello Friends!! I hope this post finds you all well!! Today Our Daily Bread Designs has a fun Christmas release!! The best part is that t...
-
 Happy Monday Everyone!! I hope everyone had a great weekend!! It was so nice to see some sun after having a few weekends of major rain. T...
My dt alumni friends
-
-
-
-
-
-
-
Bee-lieve6 years ago
-
Natural Beauties ~ Power Poppy7 years ago
-
-
-
-
Attention Hoarders. . .11 years ago
-
ODBD For the Love of Winged Things14 years ago


