Please pray for my dear friend, Grace!!


Blogroll

Splitcoast Dirty Dozen

Splitcoast stampers Alumni

Design Teams

ODBD Bread Basket

ODBD Design Team
-
Bible Journaling | What A New Life In Jesus5 weeks ago
-
-


.jpg)


My past dt sisters at ODBD
-
Layered Sunflower8 hours ago
-
Coloring fun11 months ago
-
Wonderful Christmas Ornaments2 years ago
-
-
Natural Beauties ~ Power Poppy6 years ago
-
Feel Better Soon8 years ago
-
ODBDSLC268 Anything Goes9 years ago
Showing posts with label 3d projects. Show all posts
Showing posts with label 3d projects. Show all posts
Tuesday, April 4, 2017
Good morning all!! I hope this post finds you all well!! The weather is becoming warmer here during the day. The grass is green and our tulips look like they are about to open. The flowering trees are blossoming. I just love this time of year!!
Since Spring is now here, this month's challenge at ODBD is Spring has sprung0 create your own flowers with dies.

Since Spring is now here, this month's challenge at ODBD is Spring has sprung0 create your own flowers with dies.

ODBD Stamps Used: Lovely Flowers
ODBD Dies Used: Lattice Background, Vintage Borders, Rose, Rose Leaves, Vintage Flourish Pattern, Lovely Leaves, Beautiful Borders, Fancy Fan
I enjoyed creating budding roses using the Rose border die released this past weekend. The background is created using the Lattice Background Die that is sponged with amethyst. The frame around the image is created by die cutting the Fancy Fan die and then turning the die upside down, matching the oval on the top with the die and recutting my cardstock creating an ornate oval of sorts.
I enjoyed creating budding roses using the Rose border die released this past weekend. The background is created using the Lattice Background Die that is sponged with amethyst. The frame around the image is created by die cutting the Fancy Fan die and then turning the die upside down, matching the oval on the top with the die and recutting my cardstock creating an ornate oval of sorts.
For more inspiration for this ODBDSLC285 challenge or to link your own creation with die cut flowers, please visit the ODBD blog or my dt sisters:


Tuesday, December 6, 2016
Hello Friends!! December is here and Christmas is just around the corner. Wow!! Time Flies!! I just love this time of year as we remember the greatest gift ever given, our Savior's birth!! I am a bit behind in making Christmas cards. I love creating them and there is nothing like a personal touch sent to all those you care about.
Today I am popping in to share a scenic card I created for the ODBDSLC281 Reminder"Be Sentimental" Challenge for Our Daily Bread Designs Shining the Light Challenge. I had a blast creating this Surprise Box. It certainly does not look as busy in person as does in the picture. I just love all the sparkle of the glitter blue and white cardstock and the shimmer of the silver metallic cardstock.
The Surprise Box itself is created using a special Surprise Box die from ODBD. The snowflakes are die cut and layered using the Snow Crystals dies. The base of the box is covered with a piece of blue dp dry embossed with Darice Snowflake Swirls.


ODBD Stamps Used: Pennant Flag Verses (Clear Stamps)
We would love to see you join us for the challenge! You have until December 30 to join us. Please link your creations here. You must use at least one ODBD, Northcoast Creations, or Artistic Outpost stamp to join.
Thanks for your kind words and visits!!
blessings,

Tuesday, June 21, 2016

Hello, Friends!! I hope this post finds you all well!! Our house has been very busy with Bible school for the last few weeks preparing all the crafts and actually working with the children doing the crafts. Last week we had fun working with a variety of kids from our church and the community. It was tiring but rewarding. Yesterday, I began two online college courses to update my certification. I am sure these courses will keep me on my toes and plenty busy.
Last week I had a friend from church ask me to create a birthday card for her mom who is turning 94. It was fun to create this pop-up card. I incorporated this card with the ODBDSLC275
Pop it up or add dimension Shining the Light challenge (at ODBD).

Outside card recipe:
ODBD Stamps Used: You Bless Me So, Mini Tag Sentiments
ODBD Dies Used: Mini Tags and Labels, Pierced Circles, Circles, Doily, Pierced Rectangles, Double Stitched Rectangles, Rectangles, Beautiful Borders, Bitty Borders

ODBD inside card recipe:
ODBD Stamps Used: Birthday Blessings
ODBD Dies Used: Happy Birthday, Cakes and Candles, Celebrate and Wish, Balloons and Streamers, Stitched Ovals, Ovals, Pierced Rectangles, Bitty Borders, Numbers, Happy Birthday
I hope you enjoyed my pop up card created for a friend to give to her mother. These dies are such fun and have so many possibilities!!
For more inspiration for this challenge, Please visit my dt sisters:
We hope you are able to join us!! For more details, click here. You have until July 3 to add your creations. The challenge is to add dimension or pop it up.
Today's Verse:
When pride comes, then comes disgrace, but with humility comes wisdom.
Proverbs 11:2
Proverbs 11:2
So many of us are prideful. Pride is not only when we think the gifts and talents God has given us are our accomplishments but also in so many other areas of our lives. Pride is thinking more highly of ourselves than we ought. Is there someone you have not converse with because you think that you are better than they? All we have is a gift of God. What He has bestowed upon us, He can also take away.
Thanks for stopping by! Have a great day!
blessings,

Tuesday, November 26, 2013
Hello friends!! I hope all is well with you!! Finally getting back to posting more often since the craft show is behind me!! I can have time to breath again! It was so fun but so busy!!
Today I am popping in to share a couple of projects using the Shining the Light challenge: Use three or more circles or squares on your creation. This does not include layering.
Here is an ornament I created using not three but 7 circles!!

Ornament Recipe:
ODBD stamps Used: Christmas Pattern Ornaments
ODBD Dies Used: Custom Circle Ornaments dies
Accessories: Night of Navy craft ink, holographic Glitter
My second creation is non holiday.

Card Recipe:
ODBD Stamps Used: The Earth
ODBD Dies Used: Circle Ornaments Die
My last card is one I created for both the ODBD Shining the Light challenge and CC243 on Splitcoast Stampers which is to use Baja Breeze, Daffodil Delight and Night of Navy.

ODBD Stamps Used: Birthday Blessings, Poinsettia wreath (bow)
ODBD Dies Used: Poinsettia Wreath
For more inspiration for this challenge, please visit my dt sisters:
To see all the creations in one place or join the challenge, click here. You have until December 1st to join us. For this challenge you may use any stamps but it you have any Our Daily Bread Designs stamps we would love to see you use them. If you participate, you have a chance to win the $15 certificate toward ODBD stamps or to be Spotlighted for the Shining the Light Award (The Shining the Light Award is only for those who use ODBD stamps). We would love to see your creations.
Thanks for stopping by. I hope you were inspired in some way by my creation. Have a blessed day!!!
blessings,

Monday, December 3, 2012
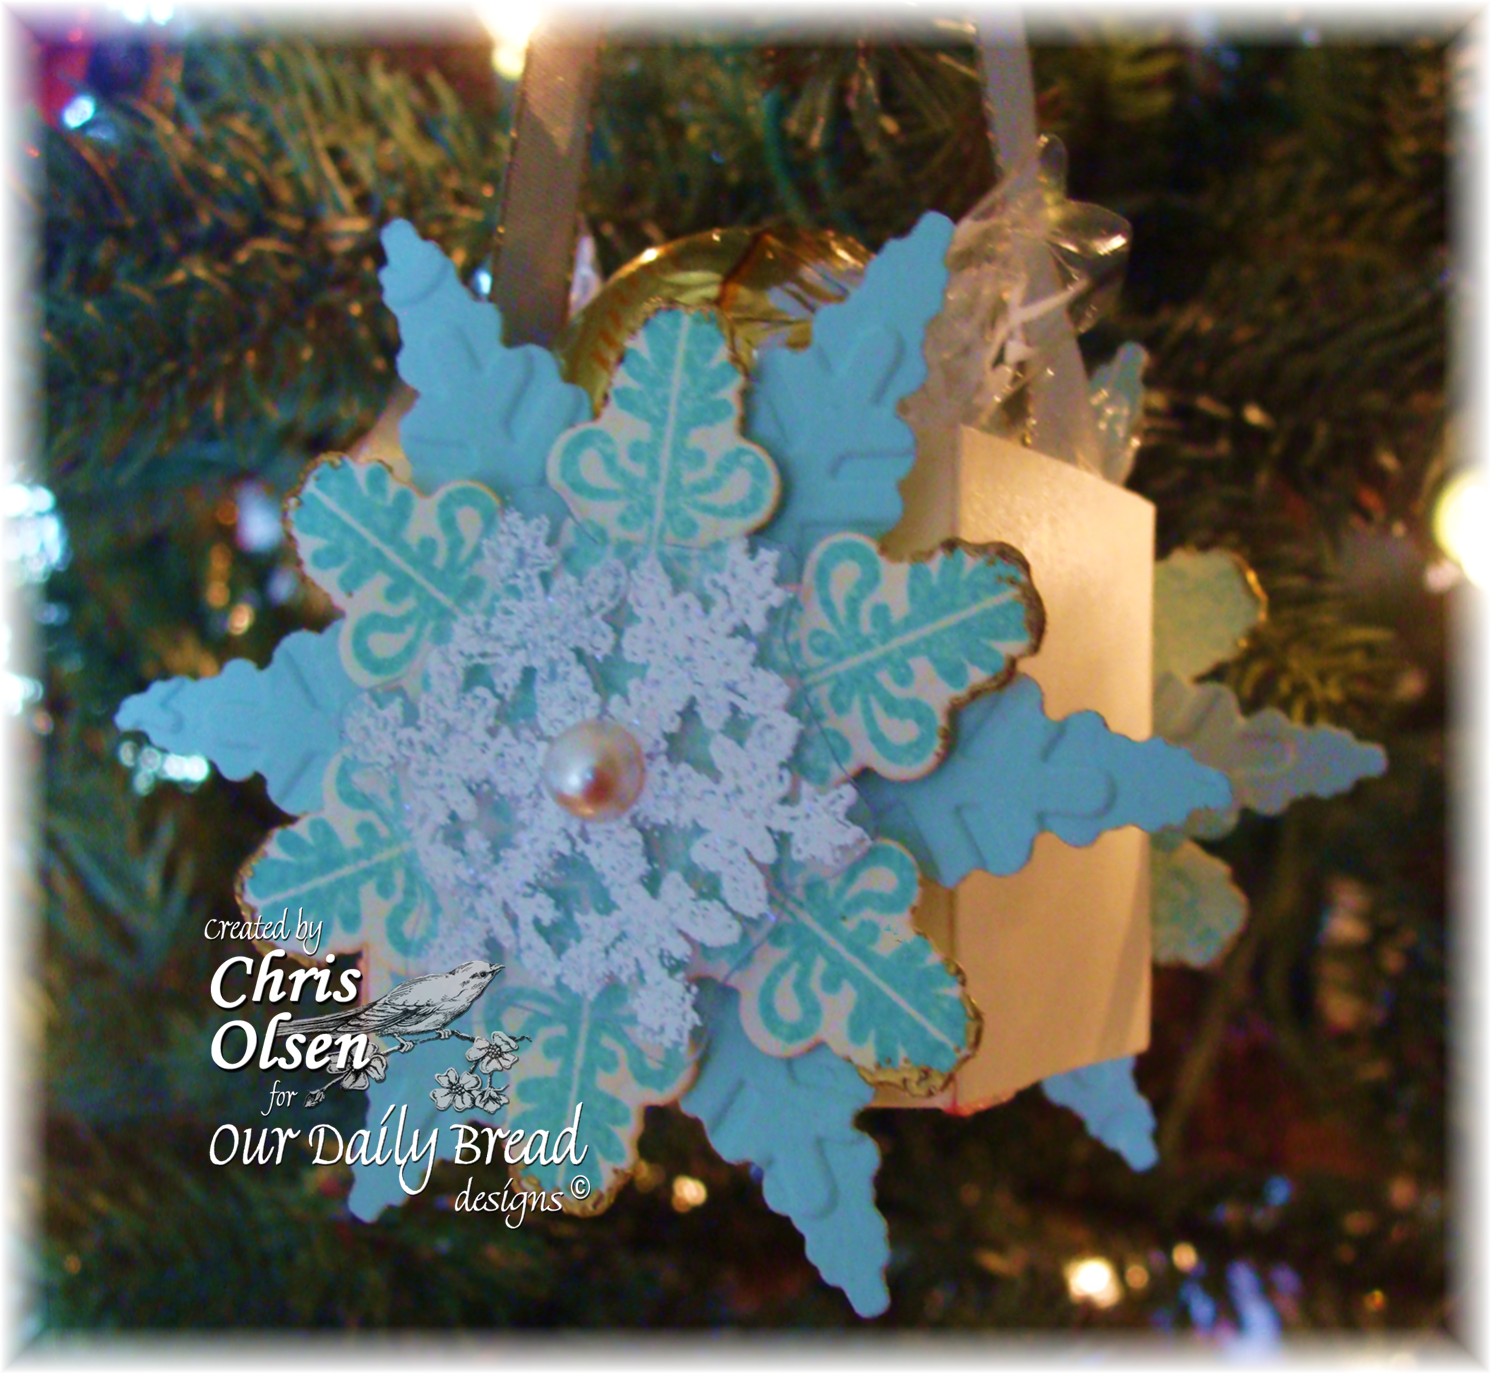
Hello Friends!! I hope you all have had a great weekend!! Sorry that I am posting so late today but I ran out of time writing a tutorial for my viewers. I had several requests for a tutorial on how to make the Ornament treat box I posted last week.

So today I wanted to share how I made it but instead of using the ODBD ornament, I used the new release Sparkling Snowflake and ODBD Snowflake Custom die. At each step, I have also left the dimension for the box I created for the ornament I already posted in italics and parenthesis). I hope you enjoy it.
For this ornament I used:
Fiskars cutter and scoring blade
1/4 inch scoretape
Vanilla Cardstock
Sky Blue cardstock (optional)
thick plastic recycled from Cuttlebug folder packaging
Cuttlebug Snowflake embossing folder from Winter Wonderland- pictured below (optional)
Baja Breeze, Sky Blue, and Versa Mark ink
Sparkling Snowflake stamp set from Our Daily Bread Designs
Our Daily Bread Designs Custom Snowflake die manufactured by Spellbinders

Step 1: Design your snowflake or ornament the way you would like. Make 2 since there is two right sides on your Snowflake Ornament treat box. (Same for the ornament treat box)
If you are using the ODBD Snowflake dies, I noticed the Cuttlebug embossing folder almost has an exact fit for the largest within the folder.


Step 2: Cut a 2 inch by 6 inch strip of vanilla paper and 2 squares that are a 1 1/2 by 1 1/2 inch (cut a 2 1/4 by 5 1/4 piece of card stock and 2 squares that are 1 3/4 by 1 3/4 for the Ornament box)


Step 3: Score a 1/4 inch line going lengthwise one each side. (same for the Ornament box)


Step 5: Cut slits from the edge on the scored lines like pictured below (same for the Ornaments treat box)

Step 6: Put 1/4 inch pieces of score tape on each corner of the box as pictured below. Repeat on both sides. Fold up sides and adhere. (same for the Ornaments treat box)


Step 8: Adhere the pre-cut Squares to the box. (same for the Ornaments treat box)
This is what it looks like when it is adhered.


Step 10: Adhere ribbon in the middle of the box starting on the bottom inside (same for the Ornaments treat box)


Here is my completed ornament:

Thanks for stopping by! I hope you are somehow inspired by my creation. .....and maybe even decide you would like to try my tutorial. It is very fun and easy to create and it is a great little something with a wow factor. Tomorrow I will share a matching card.
Have a blessed day!!
blessings,

challenges I entering my creation in:
Addicted to Stamps Challenge - Christmas TimeEclectic Ellapu - Santa Paws and/or Snow Flakes Sunny Challenges Snowflakes The Cupboard Trilogy - Frosty WinterUnique Crafters Challenge - Christmas Visible Image Monthly Challenge ChristmasMake it Monday- Anything Goes Creatalicious Challenges Winter Cupcake Craftroom Anything for ChristmasLadybug Crafts Christmas Natalie and Amy's Challenge Christmas or winter Sparkles Forum Challenges Christmas is coming Dream Valley Challenges Non-Traditional Christmas Scrapper`s Delights Paper Crafts - Non-Traditional Christmas The Ribbon Girls Christmas Projects The Squirrel & the Fox Summer or Winter 2 Sisters - #120 Christmas Sparkle (the snowflake on the front is embossed with sparkly holographic glitter) Challenge Up Your Life - 1st Snow Hiding in my Craft Room Blue & White Little Claire's Christmas Sweet Stampin Snowflakes and Ribbons
Tuesday, January 31, 2012
Happy Tuesday Everyone!! I hope you are all having a great beginning to your week!! It always amazes me how fast the weekends go!!! My how time flies!!!
I have two projects to share with you today since for some reason my post did not go live yesterday like it was suppose to. LOL!
The first is a sneak peek of the beautiful It is Well with My Soul song background stamp which I paired with the Grunge Butterfly background released last month at Our Daily Bread Designs and another sentiment sneak peek from the Mighty Sea stamp set to be released tomorrow.

Stamps: Our Daily Bread Designs: Grunge Butterfly Background, It is Well with My Soul background (sneak peek released tomorrow), sentiment from the Mighty Sea (sneak peek released tomorrow)
Accessories: turquoise seam binding, lace, pearl stick pin, Recollections crocheted flower, butterfly button, Cheery Lynn Fanciful Flourish, Martha Stewart Daisy border punch, textile embossing folder.
******************************************
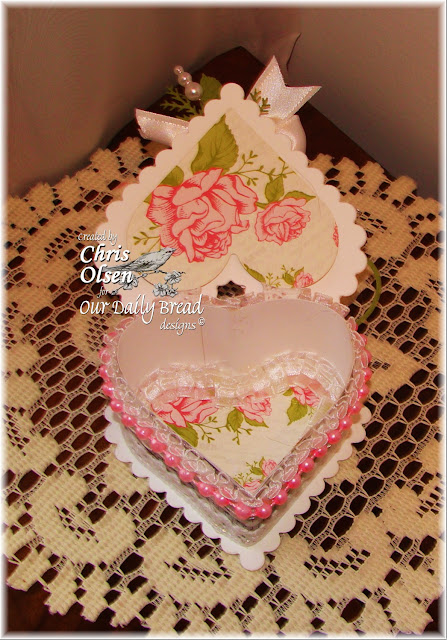
Well I have changed gears like the rest of the retail world, from Christmas to Valentines!! LOL! Today I have another fun Heart box to share with you using this week's Product Spotlight at Stamp and Create!!!
This week's Product Spotlight is the adorable Magnolia's!!!! This week all Magnolia stamps will be up to 25% off. While some stamps may be out of stock today, Lacey is getting new stock in in a day or so.
For my creation I used Tilda Sending Love Letters . This adorable image is part of the Sweet Crazy Love Collection. I also used Echo Park Victoria garden dp as well as May Arts Pink Silk Ribbon, the bow easy, White Satin Edge Ruffle Lace Trim, and the little daisy spacer which are available in the Stamp and Create store.
This heart box uses the heart box tutorial written by Beate on Splitcoast. I just love boxes and her heart box looked so beautiful, I had to give it a go. The heart shape uses the Classic Hearts and Scalloped hearts from Spellbinders.
The flowers are handmade and layered on Cheery Lynn Fanciful Flourish and Martha Stewart leaves and twig punches. The designer paper and the leaves are dry embossed.


Did you know that Stamp and Create also has weekly candy!!
The new candy is...

**In order to enter the candy, you must post the Stamp and Create's Store Logo in the side bar of your blog and link it to www.stampandcreate.com...

Enter the Candy here
For more inspiration for the challenge, please visit my dt sisters:
Vicky, Jeanette, Heidi, and Lacey
For more inspiration for the challenge, please visit my dt sisters:
Vicky, Jeanette, Heidi, and Lacey
Thanks for stopping by and for your comments!!! They are greatly appreciated! Have a great day!!
hugs,

Saturday, January 28, 2012
Happy Saturday Everyone!! I hope you are having a great weekend!! It is kind of chilly here with lots of wind and fog. Perfect weather for sleeping...LOL!! or crafts!
Today I am popping in to share this week's Shining the Light challenge at Our Daily Bread Designs!! This week's challenge is fun!!


Thanks for stopping by and for your comments!! Have a great weekend!!

Today I am popping in to share this week's Shining the Light challenge at Our Daily Bread Designs!! This week's challenge is fun!!
The team challenges you t0 a Love Recipe- Use items that remind you of Valentine’s including the word Love or Loves, hearts, lace and the colors red, white,pink and white, or both (must be more than minimal..make these colors the main colors)
To make the challenge even more fun, we will be giving out a prize, a $15 gift certificate to be used toward stamps at the Our Daily Bread Designs store!! Entries for the prize must be submitted by Friday, February 3rd at 8 a.m. EST. One random winner will be chosen and announced next Saturday. If you are not using ODBD stamps, please do not enter more than once. Additional entries without using ODBD stamps will not be commented on or will they qualify for prizes.
While it is not required to use Our Daily Bread Designs images and sentiments on your creations, we would love to see them if you have them.As a way of recognizing those who do use Our Daily Bread Designs stamps, we will again be choosing 1 to 2 creations to spotlight for our Shining the Light Award.Inorder to qualify for this award, however, you must use Our Daily Bread stamps and have yoursubmission added to Mr. Linky by Friday, February 3rd at 8 a.m. EST. If you upload your creations to Splitcoast Stampers or any other online gallery , please use the keyword is ODBDSLC94. When creating your posts on blogs please include a link to the challenge.
Here is my take on the challenge:
This heart box uses the heart box tutorial written by Beate on Splitcoast. I just love boxes and her heart box looked so beautiful, I had to give it a go. I used a sentiment (which I love) from the new Mighty Ocean stamp set at Our Daily Bread Designs to be released on Feb. 1. The dp is from Echo Park Victoria Garden. The heart shape uses the Classic Hearts and Scalloped hearts from Spellbinders. The flowers are recycled primas that I crunched, crinkled and layered. The leaf flourish is from Cheery Lynn Fanciful Flourish. The other leaves are embossed and cut out with the Martha Stewart's Leaf punch. The pearl beads, pearl heart pin, and lace were gifted to me by a very dear friend!!!


The inside of my box:
Heart Box Recipe:
Stamps: Our Daily Bread Designs- sneak peek of The Mighty Ocean
Paper: Neenah White (110 lb,), Echo Park Dp
Accessories: Spellbinders Heart (Classic and Scalloped), May Arts Satin White Ribbon, Pearl hat pin, Cheery Lynn Fanciful flourish, lace, ruffled ribbon, recycled Prima flowers, Martha Stewart Twig punch, pink pearl beads
Tutorial: heart box tutorial written by Beate on Splitcoast
In case you can't read the sentiment, this is what it says:
For as deep as the ocean,
or as wide as the sea,
so is His love given to thee.
There seems no greater love I can think of, even at Valentine's Day, than that of the Father to send His one and only Son into this world as both spirit and human to sacrifice His life on the cross for us. Thanks be to God for this eternal gift!!
I made this box for Valentine's Day but also as a reminder for someone who will be going through a very serious stem cell transplant shortly. I pray this uplifts her and reminds her of the Father's love!!
I am also entering this in three other challenges. The Stampin Sisters in Christ Challenge #123, to make a heart stand out on your card/project which you can find here. The verse for the challenge is:
The second challenge is from Cheery Lynn Designs for Challenge #12, to use dry embossing and Cheery Lynn dies. You can find the challenge here. I dry embossed the leaves on my creation and used the Fanciful Flourish die.
and
The Third Challenge is Word Art Wednesday which a relatively new challenge. The purpose of this challenge is to share quotes and passages of the Bible.
Scripture: "Let love and faithfulness never leave you; bind them around your neck, write them on the tablet of your heart." Proverbs 3:3
The second challenge is from Cheery Lynn Designs for Challenge #12, to use dry embossing and Cheery Lynn dies. You can find the challenge here. I dry embossed the leaves on my creation and used the Fanciful Flourish die.
and
The Third Challenge is Word Art Wednesday which a relatively new challenge. The purpose of this challenge is to share quotes and passages of the Bible.
For more inspiration for this challenge, please visit my dt sisters:
To see all the creations in one place or join the challenge, click here.
We hope you can join the challenge! We look forward to seeing your creations!!
Today is Wanda's last day as a guest on the challenge team at ODBD. Wanda was such fun to work with and her creations were outstanding. She is very talented and I had such a great time getting to know her. Thanks Wanda!! See you in blog land. You are such an inspiration!!
blessings,

Subscribe to:
Posts (Atom)
Popular Posts
-
 This Blog Candy is now Closed. The winner will be announced sometime on Monday, November 2. Thanks for all who left comments!!! Woo hoo! ...
 -
 Candy is now closed....Edited to include: Anywho...today is the day I said I would announce the birthday blog candy winner!! Thanks to...
 -
 Hello my friends! Welcome to the Our Daily Bread designs April Release Blog Hop! If you got here from Grace's incredible blog , yo...
 -
 Hello friends!! Welcome to the Our Daily Bread Designs October Release Blog Hop!! If you got here from Sandee 's Blog , you are in...
 -
 Happy Tuesday Friends!! I hope you are having a great beginning to your day!! Today I am popping in to share a card using a sketch for ...
 -
 Hello Friends!! I hope this post finds you all well!! Today Our Daily Bread Designs has a fun Christmas release!! The best part is that t...
 -
 Hello Friends!! I hope you all had a great weekend!! Here it is November already! Time is flying and the holidays are upon us. It is ti...
 -
 Hello, Friends!! Today the breadbasket will be sharing cards or projects they created with the new stamp and die sets just released at th...
My dt alumni friends
-
Layered Sunflower8 hours ago
-
-
An Afternoon in Sheboygan2 days ago
-
It's a STAMPtember Blog Party!!3 days ago
-
-
-
Bee-lieve5 years ago
-
Natural Beauties ~ Power Poppy6 years ago
-
-
-
-
Attention Hoarders. . .10 years ago
-
ODBD For the Love of Winged Things13 years ago

